Simulation Support in PhotonLib
Attention
This page details the current simulation support for Java. For other languages, see Simulation Support in PhotonLib (Deprecated).
What Is Simulated?
Simulation is a powerful tool for validating robot code without access to a physical robot. Read more about simulation in WPILib.
PhotonLib can simulate cameras on the field and generate target data approximating what would be seen in reality. This simulation attempts to include the following:
- Camera Properties
Field of Vision
Lens distortion
Image noise
Framerate
Latency
- Target Data
Detected / minimum-area-rectangle corners
Center yaw/pitch
Contour image area percentage
Fiducial ID
Fiducial ambiguity
Fiducial solvePNP transform estimation
Camera Raw/Processed Streams (grayscale)
Note
Simulation does NOT include the following:
Full physical camera/world simulation (targets are automatically thresholded)
Image Thresholding Process (camera gain, brightness, etc)
Pipeline switching
Snapshots
This scope was chosen to balance fidelity of the simulation with the ease of setup, in a way that would best benefit most teams.

Drivetrain Simulation Prerequisite
A prerequisite for simulating vision frames is knowing where the camera is on the field– to utilize PhotonVision simulation, you’ll need to supply the simulated robot pose periodically. This requires drivetrain simulation for your robot project if you want to generate camera frames as your robot moves around the field.
References for using PhotonVision simulation with drivetrain simulation can be found in the PhotonLib Java Examples for both a differential drivetrain and a swerve drive.
Important
The simulated drivetrain pose must be separate from the drivetrain estimated pose if a pose estimator is utilized.
Vision System Simulation
A VisionSystemSim represents the simulated world for one or more cameras, and contains the vision targets they can see. It is constructed with a unique label:
// A vision system sim labelled as "main" in NetworkTables
VisionSystemSim visionSim = new VisionSystemSim("main");
PhotonLib will use this label to put a Field2d widget on NetworkTables at /VisionSystemSim-[label]/Sim Field. This label does not need to match any camera name or pipeline name in PhotonVision.
Vision targets require a TargetModel, which describes the shape of the target. For AprilTags, PhotonLib provides TargetModel.kAprilTag16h5 for the tags used in 2023, and TargetModel.kAprilTag36h11 for the tags used starting in 2024. For other target shapes, convenience constructors exist for spheres, cuboids, and planar rectangles. For example, a planar rectangle can be created with:
// A 0.5 x 0.25 meter rectangular target
TargetModel targetModel = new TargetModel(0.5, 0.25);
These TargetModel are paired with a target pose to create a VisionTargetSim. A VisionTargetSim is added to the VisionSystemSim to become visible to all of its cameras.
// The pose of where the target is on the field.
// Its rotation determines where "forward" or the target x-axis points.
// Let's say this target is flat against the far wall center, facing the blue driver stations.
Pose3d targetPose = new Pose3d(16, 4, 2, new Rotation3d(0, 0, Math.PI));
// The given target model at the given pose
VisionTargetSim visionTarget = new VisionTargetSim(targetPose, targetModel);

// Add this vision target to the vision system simulation to make it visible
visionSim.addVisionTargets(visionTarget);
Note
The pose of a VisionTargetSim object can be updated to simulate moving targets. Note, however, that this will break latency simulation for that target.
For convenience, an AprilTagFieldLayout can also be added to automatically create a target for each of its AprilTags.
// The layout of AprilTags which we want to add to the vision system
AprilTagFieldLayout tagLayout = AprilTagFieldLayout.loadFromResource(AprilTagFields.k2024Crescendo.m_resourceFile);

visionSim.addAprilTags(tagLayout);
Note
The poses of the AprilTags from this layout depend on its current alliance origin (e.g. blue or red). If this origin is changed later, the targets will have to be cleared from the VisionSystemSim and re-added.
Camera Simulation
Now that we have a simulation world with vision targets, we can add simulated cameras to view it.
Before adding a simulated camera, we need to define its properties. This is done with the SimCameraProperties class:
// The simulated camera properties
SimCameraProperties cameraProp = new SimCameraProperties();
By default, this will create a 960 x 720 resolution camera with a 90 degree diagonal FOV(field-of-view) and no noise, distortion, or latency. If we want to change these properties, we can do so:
// A 640 x 480 camera with a 100 degree diagonal FOV.
cameraProp.setCalibration(640, 480, Rotation2d.fromDegrees(100));
// Approximate detection noise with average and standard deviation error in pixels.
cameraProp.setCalibError(0.25, 0.08);
// Set the camera image capture framerate (Note: this is limited by robot loop rate).
cameraProp.setFPS(20);
// The average and standard deviation in milliseconds of image data latency.
cameraProp.setAvgLatencyMs(35);
cameraProp.setLatencyStdDevMs(5);
These properties are used in a PhotonCameraSim, which handles generating captured frames of the field from the simulated camera’s perspective, and calculating the target data which is sent to the PhotonCamera being simulated.
// The PhotonCamera used in the real robot code.
PhotonCamera camera = new PhotonCamera("cameraName");

// The simulation of this camera. Its values used in real robot code will be updated.
PhotonCameraSim cameraSim = new PhotonCameraSim(camera, cameraProp);
The PhotonCameraSim can now be added to the VisionSystemSim. We have to define a robot-to-camera transform, which describes where the camera is relative to the robot pose (this can be measured in CAD or by hand).
// Our camera is mounted 0.1 meters forward and 0.5 meters up from the robot pose,
// (Robot pose is considered the center of rotation at the floor level, or Z = 0)
Translation3d robotToCameraTrl = new Translation3d(0.1, 0, 0.5);
// and pitched 15 degrees up.
Rotation3d robotToCameraRot = new Rotation3d(0, Math.toRadians(-15), 0);
Transform3d robotToCamera = new Transform3d(robotToCameraTrl, robotToCameraRot);

// Add this camera to the vision system simulation with the given robot-to-camera transform.
visionSim.addCamera(cameraSim, robotToCamera);
Important
You may add multiple cameras to one VisionSystemSim, but not one camera to multiple VisionSystemSim. All targets in the VisionSystemSim will be visible to all its cameras.
If the camera is mounted on a mobile mechanism (like a turret) this transform can be updated in a periodic loop.
// The turret the camera is mounted on is rotated 5 degrees
Rotation3d turretRotation = new Rotation3d(0, 0, Math.toRadians(5));
robotToCamera = new Transform3d(
        robotToCameraTrl.rotateBy(turretRotation),
        robotToCameraRot.rotateBy(turretRotation));
visionSim.adjustCamera(cameraSim, robotToCamera);
Updating The Simulation World
To update the VisionSystemSim, we simply have to pass in the simulated robot pose periodically (in simulationPeriodic()).
// Update with the simulated drivetrain pose. This should be called every loop in simulation.
visionSim.update(robotPoseMeters);
Targets and cameras can be added and removed, and camera properties can be changed at any time.
Visualizing Results
Each VisionSystemSim has its own built-in Field2d for displaying object poses in the simulation world such as the robot, simulated cameras, and actual/measured target poses.
// Get the built-in Field2d used by this VisionSystemSim
visionSim.getDebugField();
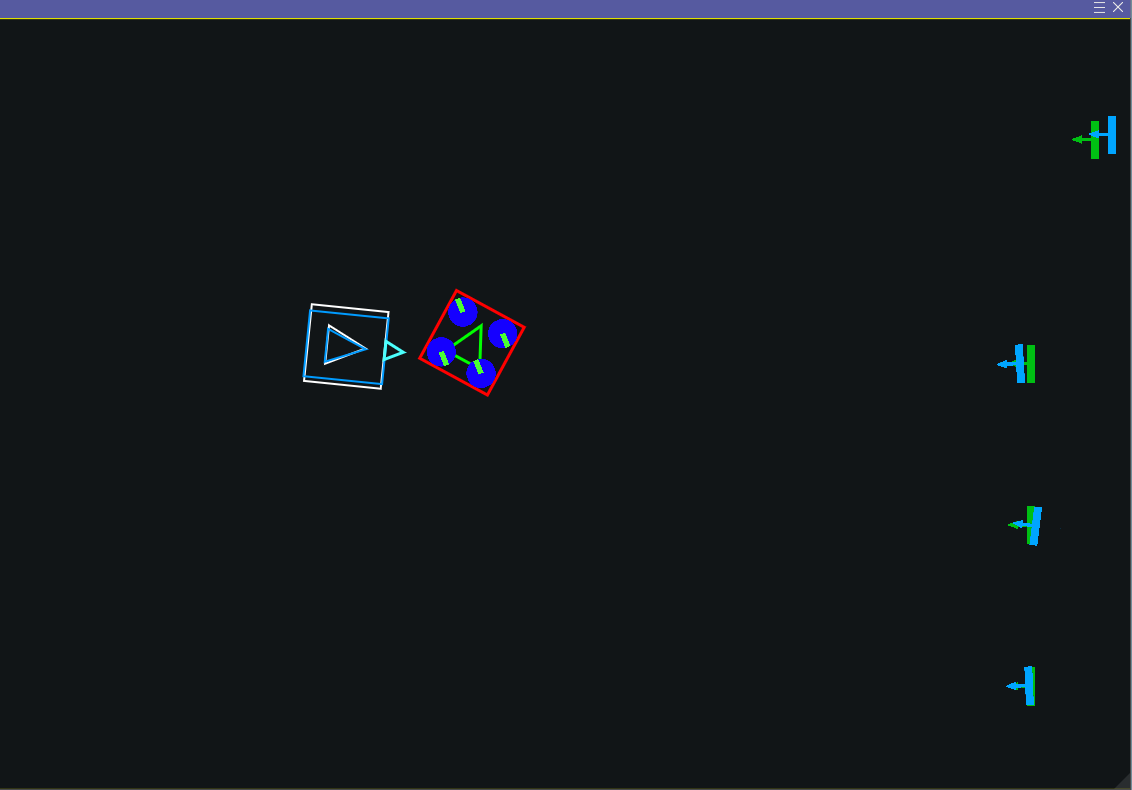
A VisionSystemSim‘s internal Field2d customized with target images and colors, as seen in the swervedriveposeestsim example.
A PhotonCameraSim can also draw and publish generated camera frames to a MJPEG stream similar to an actual PhotonVision process.
// Enable the raw and processed streams. These are enabled by default.
cameraSim.enableRawStream(true);
cameraSim.enableProcessedStream(true);

// Enable drawing a wireframe visualization of the field to the camera streams.
// This is extremely resource-intensive and is disabled by default.
cameraSim.enableDrawWireframe(true);
These streams follow the port order mentioned in Camera Stream Ports. For example, a single simulated camera will have its raw stream at localhost:1181 and processed stream at localhost:1182, which can also be found in the CameraServer tab of Shuffleboard like a normal camera stream.
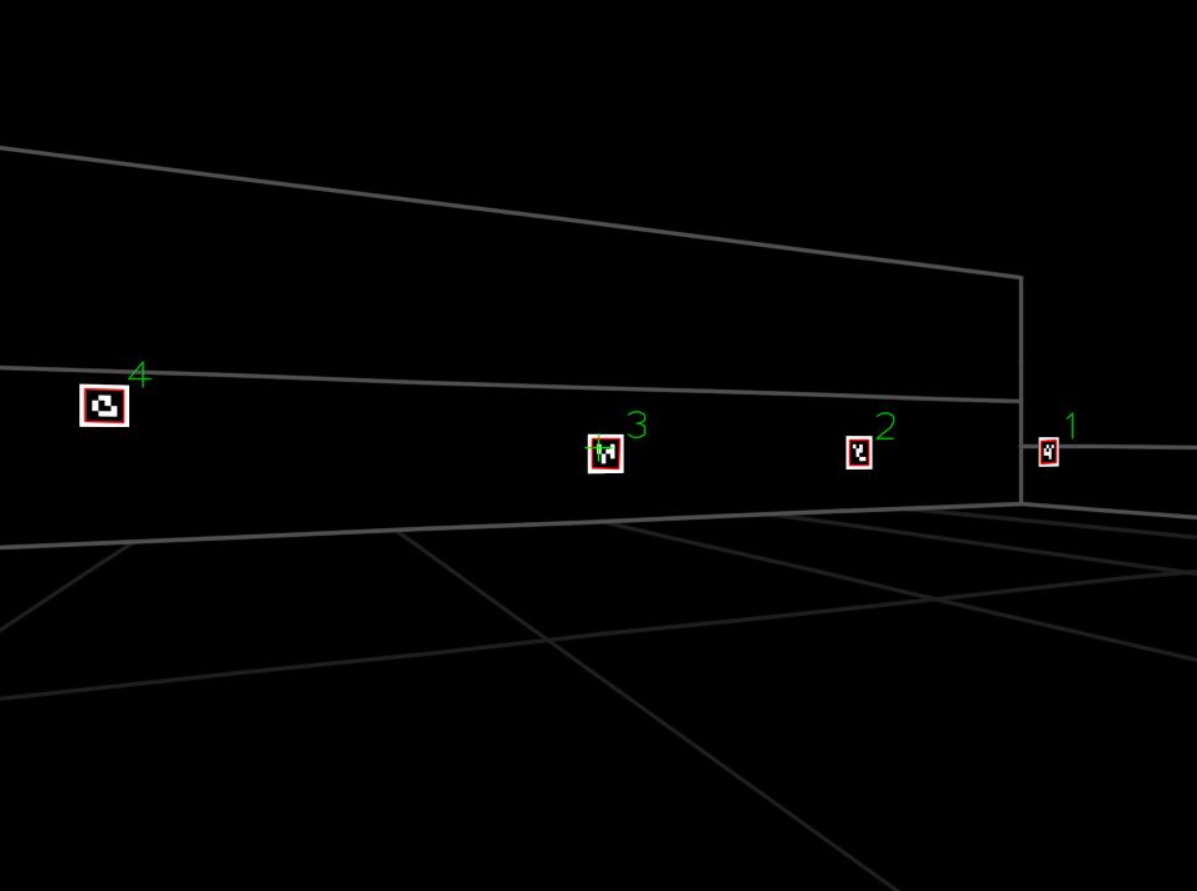
A frame from the processed stream of a simulated camera viewing some 2023 AprilTags with the field wireframe enabled, as seen in the swervedriveposeestsim example.